Showing posts with label stamps. Show all posts

Wednesday, June 24, 2015

A-Dress Your Mess-Planner Clips

I  love how these little Planner Clip Paper Dresses turned out! Yes, they are made using a stamp, paper, Stickles and E600 glue. Again super simple!  They are all for sale in my Etsy Shop ,so if you don't feel like making your own stop in and pick up a few. :D


Time to block off some time for the BEACH! ~~~~

I had a special request for a Butterfly Clip too! :D


Thanks for visiting! 
Let's Connect: YouTube, Facebook page, Instagram, Twitter & Etsy! :D

Tuesday, May 19, 2015

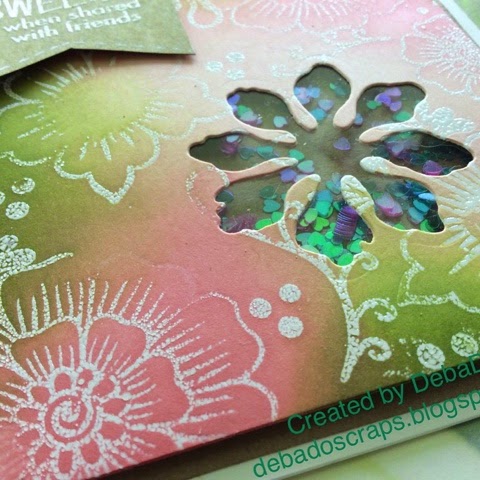
Friendship! Embossed Shaker Card

I made this card as part of the MFT Color Challenge 21. It's my first time participating in one of their challenges, so I hope they like it

Here's what I did to make this shaker card: Stamp and emboss the card base using clear Embossing ink and powder. I then applied distress inks, after which I cut out a flower using a metal die and filled the space with glitter! Super easy.


The sentiment is stamped using white embossing powder. 


This was a very quick and easy card to put together. Shaker cards are all the rage right now so I hope you give one a try.

The Video! [ I decided not to voice over this video.  Please let me know what you think? Also, I attempted a new camera angle so the project is out of screen quite a bit.  Not one of my best videos, but it does show how to create this card. ]


Thanks for visiting! 
Let's Connect: YouTube, Facebook page, Instagram and Twitter! :D

Below I've given some further details that weren't provided in the video.  I've also listed many of the supplies I used for your convenience. 

The Specifics:
Card base 4 1/2 by 5 1/2 inches
Background Kraft paper is 4 1/4 by 5 1/4 inches
Floral Card 4 by 5 inches

Ranger Distress Mini Ink Kits, Kit 1 : Spun Sugar, Worn Lipstick, Peeled Paint
Altenew Hennah Elements Clear 


Monday, May 11, 2015

How to Make Mother's Day Cards! 2015

Happy Mother's Day! (After), I couldn't post theses card images until after mother's day because my mother visits my blog regularly, Thanks Mom!

This card is made using heavy cardstock from Michael's and a stamp from Joann's (Stampendous Q123 Fresh Bloom).  I then colored a couple of random flowers and colored the background using Copic marker Copic Markers (v22, y21, y17)

This shaker card was made using heavy cardstock, a Prima Marketing Mixed Media Doll Cling Rubber Stamp, my girl's name is Keira. The sentiment was cut out using my Cricut Explore Cutting Machine, the heart bush was made using Stamps by Judith and the background was colored using Tim Holtz distress inks by Ranger.  I simply cut out the window with a ruler and craft knife backed it with acetate and filled it with Martha Stewart Crafts Iridescent Hearts & Stars Glitter .

I'll do a video making more cards that are spin-off of these meaning they won't be exactly like these but inspired by these.  So be sure to subscribe to my YouTube channel so you don't miss it!

I hope you had a fabulous Mother's Day! I did! My son sent me flowers and chocolates. He is underway with the NAVY, so we don't get to spend every holiday together, but it was nice that he had a chance to honor his ol' mom. I spent the day with my mother and prepared a slow cooked pork roast for pulled pork sandwiches and spent the day out on the front porch enjoying the beautiful Spring weather. :D  Tell me about you day! 

Thanks for visiting! 
Let's Connect: YouTube, Facebook page, Instagram and Twitter! :D

Monday, April 20, 2015

Happy Monday! #1: Pretty Spring Greeting Card

Today I made a simple Spring card made using homemade paper flowers and stamped embossing. The paper flowers I made were made using the Sizzix Bigz Die - Tattered Florals by Tim Holtz as well as a couple of the Ranger Tim Holtz® Distress Ink Minis.

In this video, you'll see just what I think about the MISTI! The newest stamping tool on the market.


If you are interested in any of the products I used you can find many of them listed below.  They contain affiliate links so yes I would reap a very small commission from any purchases you make.  So thanks in advance! :D


Thanks for visiting! 

Let's Connect: YouTube, Facebook page, Instagram and Twitter! :D


Thursday, March 19, 2015

Thursday Stampin' Time! #2: Smile With Me

In today's Stampin' Time, we make a Spring inspired card featuring a colorful floral wreath embellished with ribbon and rhinestone accents.

Using ordinary painter's tape, parchment paper, and a Spellbinders Nestabilities Die Cut Set I created a negative stamping mask.  So, the entire card base was covered with the masking except for the flower petal shape in the center.


I then stamped the sentiment in the center of that and followed that up with tiny floral and leaf stamps found in the Martha Stewart Crafts Clear Stamps - Flowers, Butterflies, "Thank You" and "Happy Birthday" Stamp set. This set includes a wide variety of flower buds, leaves, butterflies and small floral bundles.  I received the stamp set as a bonus when I purchased the Martha Stewart Crafts Frame Border Punch Starter Kit with Clear Stamp Set


I used Ranger Distress Mini Ink Kits, in a variety of colors pictured below.  The sentiment and the butterflies are stamped using Ranger AIP-31468 Archival Inkpad, Jet Black .


Because I had the leftover positive stamping masked I adhered it to another card base and created this second card using the same stamping technique except I used Clearsnap ColorBox Pigment Petal Point Option Inkpad 8-Color, Pinwheel.


These cards were inspired by a card tutorial I watched by K Werner Design.  

Thanks for visiting! 
Let's Connect: YouTube, Facebook page, Instagram and Twitter! :D
  

Tuesday, March 17, 2015

Let's Color! #4: In a Perfect Pearl


In a perfect world, everything would shimmer like this card made using Ranger Perfect Pearls Embellishment Pigment Kit, Metallics.  Perfect Pearls are easy to woek with and not quite as messy as glitter.


This card is perfect for cheering up a dear friend or to congratulate the prom queen. You could turn it into a bridal party/shower invite or a thank you note as well.

Deep Red always makes the best deeply detailed stamps with intricate design. The
Deep Red Cling Stamp-Dress Form Flourish that I used here is so elegant I will definitely be using it again, very soon.

I chose to design this card to look like a dress one would envy in a window on a window-shopping stroll.  Or as a portrait in an antique frame.

Follow along with the video below to create a card similar to this one.


Thanks for visiting! 
If you have time, please stop by my Facebook page, Instagram and Twitter! :D

**********************************************************************
For you convenience, I've listed most if not all the supplies I used for this project.